
Here we teach you step by step React Native Simple Chat Application using Gifted Chat Component with Firebase, A Real-time Database Storage. Firebase can store 100 Users and 1 GB Storage. This storage allows to upload images and profile where gifted chat can display.
We are using react native expo where we built our application also for registration we use Firebase setup
On our app we are creating chat on behalf of user login. Where user can login with username and password and a user ID will generate. Then after we save user ID in Local Storage and get user id on chat page then display chat according to user id and customer id.
What is Firebase?
On our app we are creating chat on behalf of user login. Where user can login with username and password. This is used to store other user of message; Firebase is used for real-time database. This is a cloud service by Google that provides authentication storage and other services, here we use only use authentication and Database and Storage. The database provides real-time events that the data is add or update. In this application, when someone send a text, we add the text to the DB and other users that logged in can get notify of the new msg.
How to Setup a Firebase for chat?
On Firebase, there is a free tier which we can use Spark plan. It has limit to 100 concurrent connections. This is plenty for our uses.
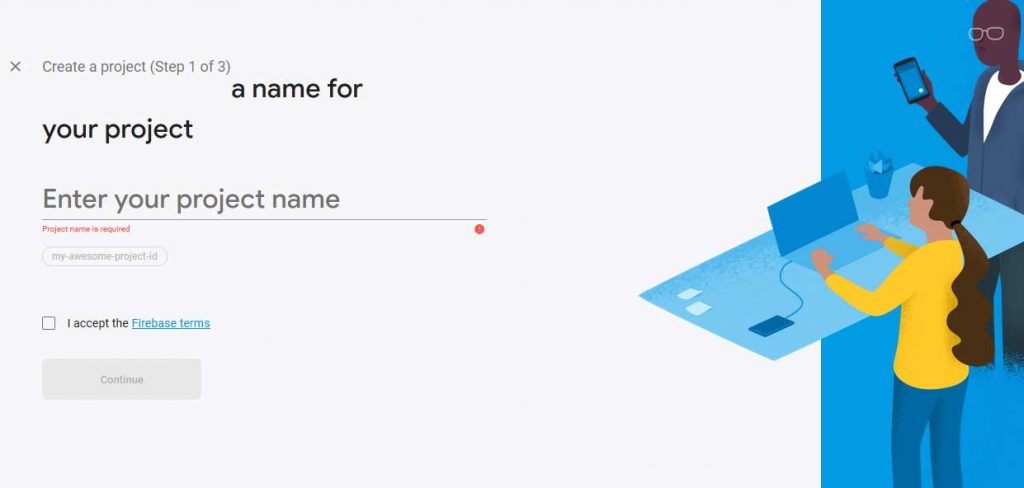
Signup and login to firebase console:
You can create a new project and enter https://console.firebase.google.com/the project name into it.
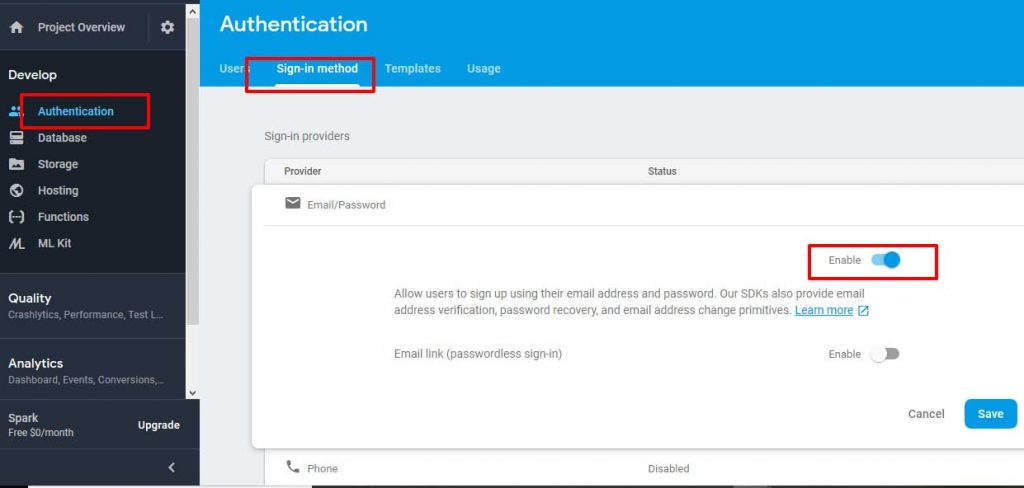
How to enable authentication in Firebase?
To enable authentication through user id and password by clicking on authentication and then sign in method then after click under the status for email or password and then click the enable switch to on. Then after click on save.
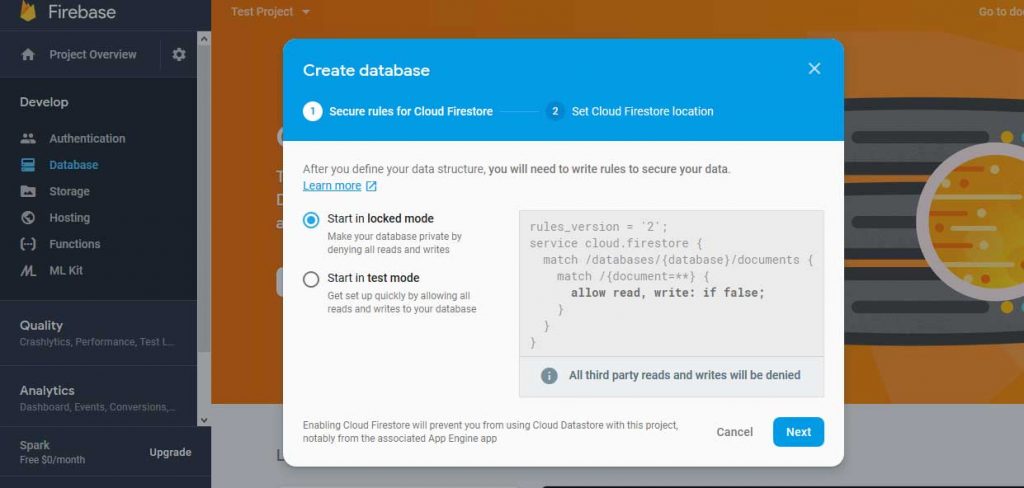
How to setup database on Firebase?
- Select Database Form Left Hand Menu and create new database
- Then Select Real-time database and change read or write to true.
Setup a Project in React Native with Expo CLI Method.
- Install Nodejs 10+ Version on your system
- Install Expo on your mobile
- Then Run Command npm install -g expo-cli
- Then after run following commands #
expo init ChatProject
cd ChatProject
- Run npm start
- Then scan QR Code to run expo application on mobile.
How to implement?
Let Create a folder component in React Native Application and create giftedchat.js file. And Then Import this js file to App.js file by using below code
import giftedchat from
'./component/giftedchat'
Thenafter you need to press, you will got a message on the bottom left screen to asking for add the package. Just click on add button. This will add the package to our package.json.
import React from 'react';

import { GiftedChat } from 'react-native-gifted-chat';export default class Chat
extends React.Component {

  render() {

    return (

      <GiftedChat />

    );

  }

}
Then Add a Login Component.
import React from 'react';

import { Text, View, Button } from 'react-native';
export default class Login extends React.Component {

  render() {

    return (

      <View>

        <Text>Login</Text>

        <Button title="Navigate to Chat"

          onPress = {()=>this.props.navigation.navigate('Chat')}

        />

      </View>

    );

  }

}
Then Create a stackNavigator in App.js and navigate to Login and Chat
import Login from './components/Login';


import Chat from './components/Chat';
// Import React Navigationimport { createStackNavigator } from 'react-navigation'
// Create the navigatorexport default createStackNavigator({

  Login: Login,

  Chat: Chat,

});
Your Packages look like that : –
{

  "dependencies": {

    "react-native-paper": "2.1.3",

    "react-native-gifted-chat": "0.4.3",

    "react-navigation": "2.18.2"

  }

}
Now Test your navigation button using expo
Click on button and try to send message.
How to setup a Firebase?
- Get Firebase Configuration:
- From Project Overview, there is a gear icon here choose project settings
- Then scroll below the bottom and click Add Firebase to your Application, to get configuration.
- Copy the Configuration Section to get API Key and Save it
- Or You can have added Manually new user. Authentication -> New User
- Create a New File firebasesetup.js then add below code to firebase settings
import
firebase from 'firebase';
class FirebaseSvc { constructor() {
if (!firebase.apps.length) { //avoid re-initializing
firebase.initializeApp({
apiKey: “<your-api-key>”,
authDomain: “<your-auth-domain>”,
databaseURL: “https://<your-db-url>.firebaseio.com”,
projectId: “<your-project-id>”,
storageBucket: “<your-storage-bucket>.appspot.com”,
messagingSenderId: “<your-sender-id>”
});
}
}login = async(user, success_callback, failed_callback) => {
await firebase.auth()
.signInWithEmailAndPassword(user.email, user.password)
.then(success_callback, failed_callback);
}
}const firebaseSvc = new FirebaseSvc();
export default firebaseSvc;
Then click add Firebase to package.json and click on add.
Add login.js file to read user input and call it in firebase class
// add import
import firebaseSvc from ‘../FirebaseSvc’;
state = {
email: ‘test99@gmail.com’,
password: ‘test123’,
};
onPressLogin = async () => {
const user = {
email: this.state.email,
password: this.state.password,
};
firebaseSvc.login(user, this.loginSuccess, this.loginFailed);
};loginSuccess = () => {
console.log(‘login successful, navigate to chat.’);
this.props.navigation.navigate(‘Chat’, {
name: this.state.name,
email: this.state.email,
});
};loginFailed = () => {
alert(‘Login failure. Please tried again.’);
};
onChangeTextEmail = email => this.setState({ email });
onChangeTextPassword = password => this.setState({ password });
Create a Login Account?
- You need to Register a login account where username, full name, email, password and profile pic will be uploaded
- Then Login into that user account by using username and password
- Then we will create an account using function createUserWithEmailAndPassword which takes in email and password.
firebase.auth()
.createUserWithEmailAndPassword(user.email, user.password)
- When Account Created successfully then Update profile display name and profile
- Lets add method createAccount in FirebaseSvc.js to create new login.
createAccount = async (user) => {
firebase.auth()
.createUserWithEmailAndPassword(user.email, user.password)
.then(function() {
var userf = firebase.auth().currentUser;
userf.updateProfile({ displayName: user.name})
.then(function() {
alert(“User ” + user.name + ” was create successfully.”);
}, function(error) {
console.warn(“Error update displayName.”);
});
}, function(error) {
console.error(“got error:” + error.message);
alert(“Create account failed.”);
});
}
Create a Profile Image?
To add an image, we need to get the url of user image. We will allow to upload it inside the photo gallery of camera. Then image will have uploaded in firebase storage in cloud
uploadImage = async uri => {
try {
const response = await fetch(uri);
const blob = await response.blob();
const ref =
firebase.storage().ref(‘avatar’).child(uuid.v4());
const task = ref.put(blob);
return new Promise((resolve, reject) => {
task.on(‘state_changed’, () => {
}, reject,
() =>
resolve(task.snapshot.downloadURL));
});
} catch (err) {
console.log(‘uploadImage error: ‘ +
err.message);
}
When user upload the image, the state is updated. Then call to Profile Image to update user profile with URL. Profile Image is similar to update the user Name of User and they display Name and avatar is used in the Gifted Chat component. If profile is not available, then name will show of user
Now We are ready to create account and upload image there.
How to Update Chat Message?
Let start to update the chat message. This component will tie to state message which is an array of object.
In this chat we need the user details to create message also we can pass prop from the Login screen. Then we create message array.
The message are updated when the component is mounted by calling to the firebaseSvc to refOn method. When state is update Chat will Refresh.
How to test chat message module of React Native?
Let start testing will login and send message. As you type message send message will enable.
Verify Message in Firebase Console
- Select Firebase Console
- Select Database from Left Menu and then select Real-time Database
- Then You check message and details of every user
Here is the Full Chat JavaScript File for React Native. Join ACIL, Web Designing Course in Gurgaon to Learn Full React Native Development